The tiles are fine and the bathroom is clean, but what about the grout lines? In bright light, it looks grey, stained, and almost sticky. You kneel down with a sponge and scrub until your wrist hurts, but nothing really changes. Like bad memories, the dirt seems to be baked into those thin lines.
You start to wonder if you should call a professional, regrout the whole floor, or just pretend the lights don’t work and keep the room dark.
Then someone says something that sticks with you: “Mix three things together and brush it on the grout. In 15 minutes, it looks brand new.”

Sounds like a clickbait.
Also sounds like something to try.
The mix of three ingredients that brings your grout back to life
The basic recipe seems almost too easy.
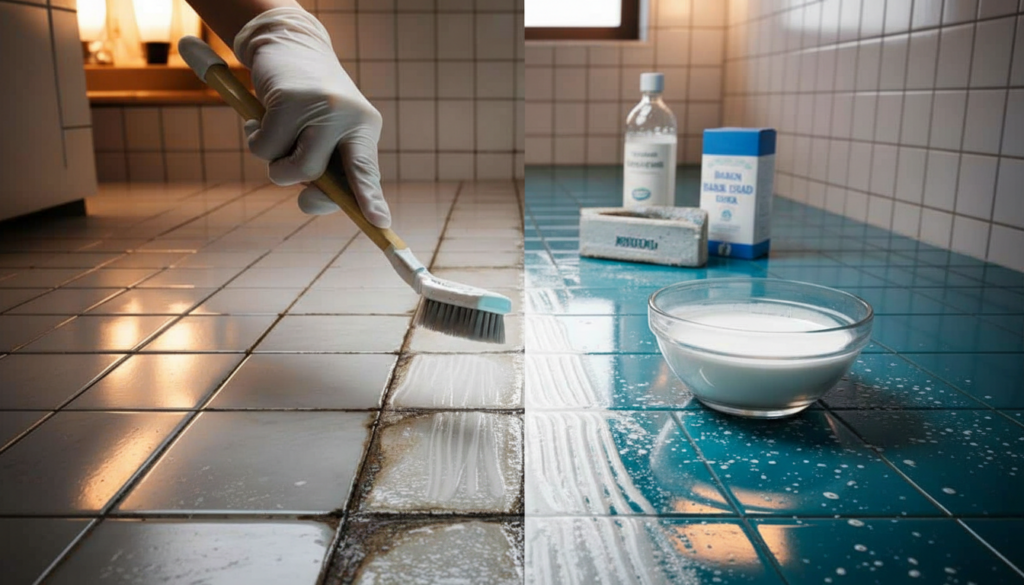
You get some baking soda from the kitchen, some hydrogen peroxide from the first-aid kit, and a tiny bit of dish soap from the sink. Mix them together in a small bowl until you have a thick, creamy paste that will stick to the grout but not be so dry that it breaks apart. This is the grout cleaner that works like magic.
What happens next is strangely satisfying.
You put the paste on the dirty lines, wait a little while, and the grey starts to come off before you even pick up a brush.
Think of a bathroom floor that is dull and a little yellowed that you’ve stopped noticing.
On a Saturday morning, a woman on TikTok tries this mix on only half of her shower. She takes a video of it. One side of the grout lines looks like old chewing gum, while the other side turns bright, almost white. The video has millions of views because the difference between the two is so big that it seems fake.
She didn’t change the tiles.
She only used things that every grocery store sells for a few cents.
There is some chemistry behind the “grandma hack” look.
Baking soda is a mild abrasive that breaks up the film of soap scum and dirt that sticks to porous grout. Hydrogen peroxide is what makes things whiter. It breaks down organic stains from mould or mildew and lifts them off the surface. The soap for the dishes? It cuts through grease and makes it easier for the mix to get into the tiny pores.
When used together, they work like a mini deep clean without the strong smells. That’s why it feels like you’ve cheated the system when it works.
How to use the mix step by step without ruining your tiles
Begin small.
Mix 3 tablespoons of baking soda, 2 tablespoons of hydrogen peroxide, and about half a teaspoon of liquid dish soap in a bowl. Mix until smooth. Add a little more baking soda if it seems too runny, or a few drops of peroxide if it seems too thick.
 Meteorologists warn early February could signal a critical moment for Arctic stability Update
Use an old toothbrush or a small paintbrush to spread the paste right on the grout. For 10 to 15 minutes, leave it there. After that, gently scrub along the lines, wipe with a damp cloth, and then rinse with warm water. Take a step back for a second. Do you see that difference? That’s why this simple recipe spreads so quickly on the internet.
This is where a lot of people mess up: they go from not doing anything to doing a full renovation in five seconds.
They put paste all over the kitchen floor, forget where they started, and end up sliding around in soap like a cheap comedy sketch. It’s better to work in small areas, like one wall, half the shower, or a few rows of floor tiles. You also want good air flow, especially if your bathroom is small.
To be honest, no one really does this every day. The goal is a quick reset, not a new full-time job with a toothbrush.
If you’re worried about your tiles, try the mix on a spot that isn’t visible first. Most ceramic and porcelain tiles are fine with it, but natural stone tiles, like marble or travertine, can be more sensitive.
A professional cleaner I talked to said, “People think their grout is ‘permanently dirty’ when it’s really just covered in years of soap film, oils from the skin, and hard water deposits.” “Once you cut through that, the original colour surprises them.”
- Use a soft brush. Don’t use metal or very hard brushes because they can damage the grout.
- Rinse twice: once to get rid of the paste and once with clean water to get rid of any sticky residue.
- Dry the joints. An old towel or microfibre cloth can help keep mildew from growing again.
- Wear gloves while you work. Dish soap and peroxide are mild, but your skin will thank you.
- If some stains don’t come out after the first 10 minutes, do it again.
From a quick trick to a new way to look at your home
When your grout suddenly looks bright again, something small happens.
The room feels younger as a whole. The shower looks less like a chore and more like a place you want to go barefoot. Some people use this three-ingredient trick to clean, while others feel like their home isn’t “ruined,” just tired and needs a short reset.
You also see other things. The corner where water always collects. The place near the stove where splashes collect. How a 15-minute gesture changes how you walk into the room later that night.
A quarter of an hour and one simple mix. Then the small, quiet question: What else in the house looks “old” when it really just needs to be cleaned in a different way?
| Important point | Detail | What the reader gets out of it |
|---|---|---|
| A mix with only three things | Dish soap, hydrogen peroxide, and baking soda | Simple to try right away and cheap |
| 15 minutes to act | Paste sits on grout before a light scrub. | Results that are easy to see quickly |
| Small-area method | Work in sections and test on a small area first to lower the risk to the tiles and avoid getting overwhelmed. |
Questions and Answers:
Question 1: Can I use this mix on grout that is already coloured?
Yes, but always test a small, hidden area first. Peroxide can make things a little whiter, so make sure it doesn’t make your coloured grout too light.
Question 2: Does this get rid of mould and mildew?
Answer 2: Peroxide breaks down organic matter, which makes it good for light mildew stains. If the mould is deep or won’t go away, you might need a special mould remover or professional help.
Question 3: Is it safe for tiles made of natural stone?
Answer 3: Be careful. Some natural stones are sensitive to acids and some cleaners. Test carefully or use a cleaner that says it is safe for your stone.
Question 4: How often can I clean the grout this way?
Answer 4: Most homes only need it every few months. A light touch-up every 4 to 6 weeks works well in very busy kitchens or showers.
Question 5: What if the grout is still dark after cleaning?
Answer 5: That could mean the grout is permanently stained or worn down. If cleaning doesn’t change the colour anymore, you might want to try a grout pen or a new layer of grout.