You might have heard a tip from an older relative or read something online about putting a glass of water near the radiator. It sounded old-fashioned like a superstition. But as the night went on and the dryness grew, you filled a glass and put it next to the heat. The mood started to change slowly, almost without anyone noticing. In the winter, the truth tends to come out quietly.

The Quiet Science of a Glass of Water
It doesn’t seem likely that a simple glass of water could make a room feel warmer without touching the thermostat. After all, water doesn’t make heat. There’s no hidden warmth being released into the space. Instead, your body feels the heat differently.
Why dry air makes warm rooms feel colder
A radiator heats the room and takes moisture out of the air at the same time. This dryness is easy to miss at first. It shows up as itchy skin, a scratchy throat, static in clothing, or small shocks when touching metal. What’s less obvious is how dry air quietly alters temperature perception.
Your body is always giving off heat to the things around it. In dry conditions, moisture evaporates faster from your skin and with every breath you take. This evaporation draws heat away, creating a subtle cooling effect—even when the room is technically warm. The heater works, but the reading on the wall doesn’t match how your body feels.
How moisture makes warmth feel real
This is where the glass of water comes in. When you put it near a heat source, it warms up and slowly releases moisture into the air by evaporating. Even a small increase in humidity can reduce moisture loss from your skin and lungs. The temperature stays the same, but the room starts to feel softer warmer and more comfortable.
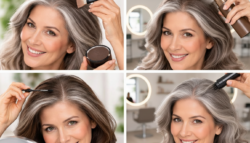
Aloe Vera as a Soft Base for Brow Styling
Aloe vera has long been valued for its soothing properties, long before it became a bottled staple. In its pure form, the gel is light, cooling, and flexible, never stiff or sticky. Applied to brows, it offers subtle hold while keeping hairs soft.
As a homemade brow gel base, aloe provides light-to-medium control and hydration. A high-quality gel with minimal additives supports brow health with each use, turning daily grooming into a care-focused ritual rather than a quick fix.
Cocoa Powder for Natural Brow Tint
Cocoa powder adds warmth and depth through its natural brown pigment. It works especially well for light to medium-dark brows, blending smoothly when mixed with aloe. Instead of harsh color, it creates a soft natural-looking tint.
This method allows full control. A small amount gives gentle definition, while a little more deepens the shade. The result blends seamlessly, avoiding sharp lines. There’s a quiet satisfaction in using an ingredient from the kitchen to softly frame your face.
Putting Together a Simple Brow Gel Kit
Making your own brow gel becomes a calm, intentional process. Clean jars, a spoon, and a spoolie each have their place. The experience feels tactile and unhurried.
The core formula relies on just two ingredients, with optional additions added later if desired. Its charm lies in its simplicity and balance.
- Pure aloe vera gel: Serves as the base, offering natural hold, moisture, and smooth application
- Unsweetened cocoa powder: Adds a soft tint to enhance natural brow color
- Small glass jar or container: Stores the finished mixture safely
- Clean spoolie or angled brush: Helps apply and shape brows evenly
- Mini spoon or mixing stick: Used to blend ingredients smoothly
Mixing the Gel Slowly and Smoothly
Add two teaspoons of aloe vera gel to a clean jar. Sprinkle in about a quarter teaspoon of cocoa powder and stir gently, pressing out any clumps. The clear gel gradually shifts into a smooth earthy brown.
Test the shade on the back of your hand and allow it to dry briefly. Adjust as needed—more cocoa for depth, more aloe for softness. The final texture should be creamy and brush-friendly. Once mixed, seal the jar and let it rest for an hour so everything settles evenly and naturally.
Applying with Care and Precision
Using a homemade brow gel encourages a slower pace. Begin with clean, dry brows. Dip a spoolie lightly into the gel, removing excess before application. Brush through brows using short feathered strokes that follow natural growth.
Work from the inner brow outward, shaping rather than drawing. For added definition, let the first layer dry before applying another, focusing on sparse areas. An angled brush can help create hair-like strokes if needed. The finish stays soft and flexible, never stiff.
Why Simple, Natural Choices Matter
Creating something at home carries quiet significance. It reduces waste, limits unnecessary ingredients, and reconnects you with the process of making. Each refill replaces disposable packaging, and each application reinforces the idea that beauty doesn’t need complexity.
Natural solutions aren’t one-size-fits-all, so listening to your skin is essential. Patch testing and small adjustments are part of the journey. In that unhurried moment—brush in hand, cocoa-scented gel nearby—you’re reminded that care can be gentle practical and personal. Sometimes, meaningful change begins with the simplest things.